Summer is long gone, and our backyard was actually completed over two years ago, so it’s probably about time we revealed our outdoor space!
First of all, I should mention that the design of our home, like many of the homes in our neighborhood, is long and narrow. As such, in order for the yard to be congruent to this design, it ends up on the side of the house, rather than in the back. Nonetheless, for simplicity purposes, I’ll still refer to it as a backyard.
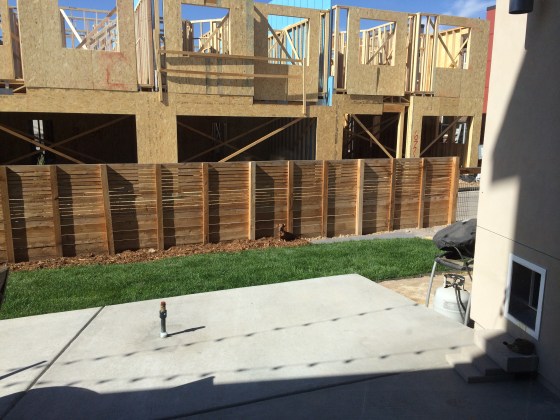
While the builders do the front yard landscaping for the homes in our community, the backyard landscaping is up to the home owner to complete within nine months of closing. When we closed on our home in late April 2015, the builder was so behind on the construction phase of our block that not only did we not have front landscaping when we moved in, but we didn’t even have our fence up around our backyard!

Adding to the delay of our landscaping installation even more was the fact that we received weeks and weeks of rain right after moving in. This was atypical for Denver and landscaping companies basically came to a halt all summer waiting for the bad weather to clear up.
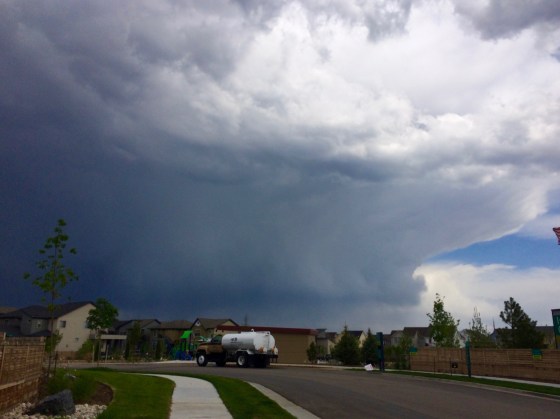
We eventually had our fence installed about two weeks after moving in, but meanwhile, taking our pups outside to a rain-soaked, clay mud yard was a no-go. When the pups needed to go outside, it required a short walk down the block to a rock landscaped area to avoid the clay mud that would stick to their paws. This inconvenience was not the end of the world, but certainly not what we expected after finally moving from our second story apartment to our new home with a yard.
Anxious to transform our mud pit into an inviting space we could use, we called a landscaping company that came out in early July to give us an estimate and a draft design of what they could do. Being that we were on a corner lot, we had slightly more backyard space and design options than the other homes in the community that were “sandwiched” in between other homes with very little space to work with.
Another advantage of the corner lot was that we could actually plant grass and other vegetation in our backyard (with the “HOA” landscaping rules, owners are not allowed to put automatic irrigation within 5 feet of the foundation; some of the homes that are not corner lots barely have a little more than 10 feet between them and the home next door, so this automatically means they can’t landscape with anything that requires irrigation).
We had already heard that other neighbors were quoted quite a bit for landscaping the tiny yards in our community, so we thought we were sufficiently prepared for the sticker shock of landscaping, but it turns out we weren’t. We were quoted over $18,000 to landscape our yard into something magical that would include artificial turf (it would have been $4,000 less for real grass), rocks, a couple of trees, shrubs, a small paved brick patio, and a raised, rock wall garden.
As if the cost wasn’t shocking enough, they projected that the earliest they could start work was September. Waiting that long and paying that much to landscape our yard seemed crazy. But, as usual, hubby was up for the task and we didn’t bother trying to get any more landscaping quotes!
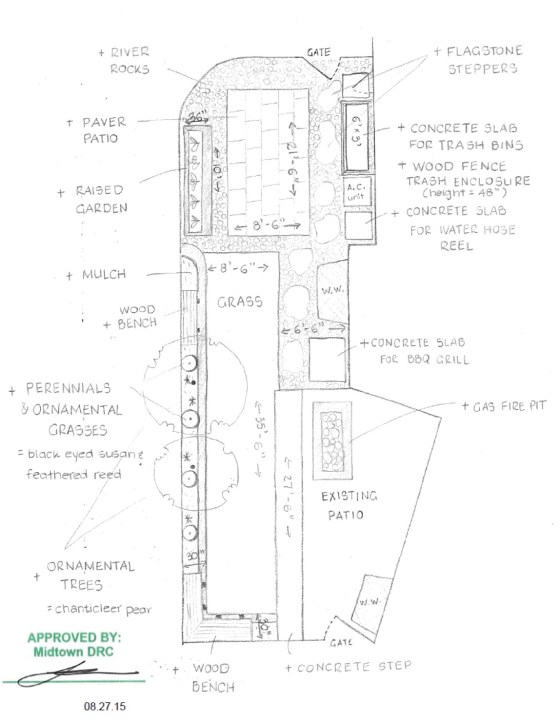
Although I couldn’t help hubby much with the yard work, since I was working on finishing grad school at the time, I helped occasionally with some physical labor (and micromanaging) and also helped draft up an idea of what we wanted our backyard to look like in order to submit for approval to our “HOA”.
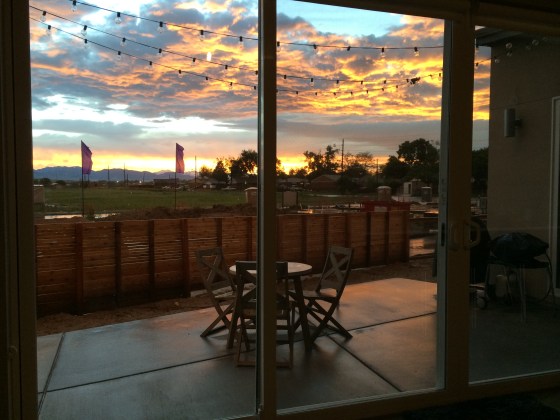
In the meantime, the townhomes that were being built to the west of us conveniently started going vertical the same time we started working on our yard. This meant that we would likely never be able to relax in our finished outdoor space before the townhomes blocked our beautiful sunset views.
Going…
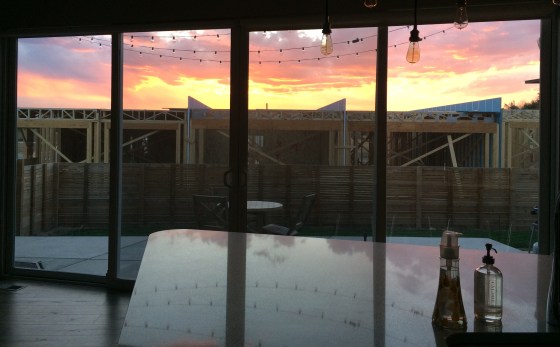
Going…
GONE!
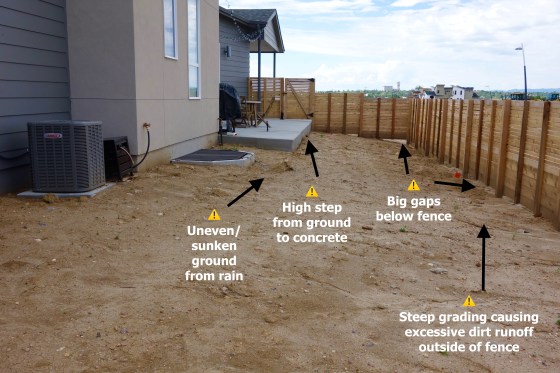
Our work was cut out for us when the bad weather stopped and we could begin work on our backyard. Before we could even get started with the “pretty” parts of landscaping, like laying down grass and planting flowers, we had to solve the steep slope of our yard and level out the areas that had washed out from the rainstorms.
While the builder did an excellent job of grading the yard for proper drainage, they didn’t create any kind of retaining wall to prevent the soil from running out of the yard through the big gaps in the bottom of the fence during heavy rainstorms. Hubby decided to build an underground retaining wall by digging a foot-deep ditch along the inside edge of the fence and laying down concrete and bricks in it. The ground was then covered up with dirt and small loose rocks to still allow for some drainage.
We couldn’t start any of the irrigation work for the backyard until the builder started the front yard and installed the irrigation system we would connect to. This delay ended up being okay because hubby had plenty of other tasks to work on in the meantime.
- Add a long concrete step from our main patio slab
- Add a small concrete slab next to the patio for our grills
- Add a small concrete slab for our hose reel
- Add a concrete slab for our trash bin and recycle bin
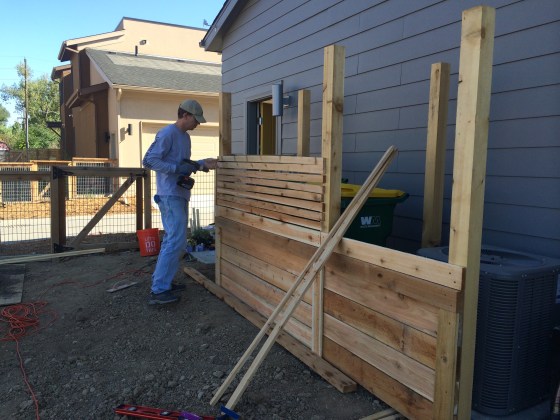
- Build a wooden enclosure for trash bins that matched the design of our existing yard fencing
- Till the ground to mix in top soil and “clay buster”
- Add metal trimming to the grass section
- Add irrigation tubing and sprinklers


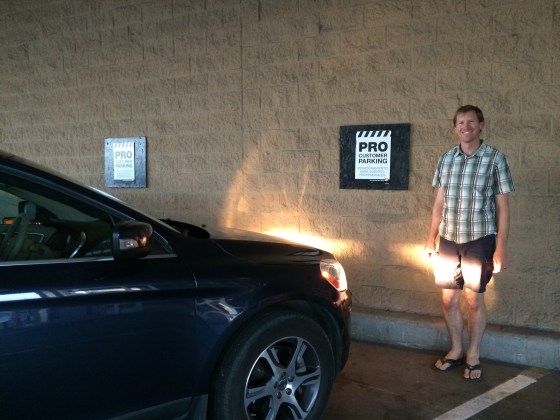
Thank goodness hubby had lots of confidence to get these tasks done because I would have no idea what I was doing if I were in his shoes. Not only that, he had plenty of snags come his way, especially when it came to the irrigation system. In fact, he had so much “confidence” that he thought he deserved the “Pro” customer parking spot at Home Depot.
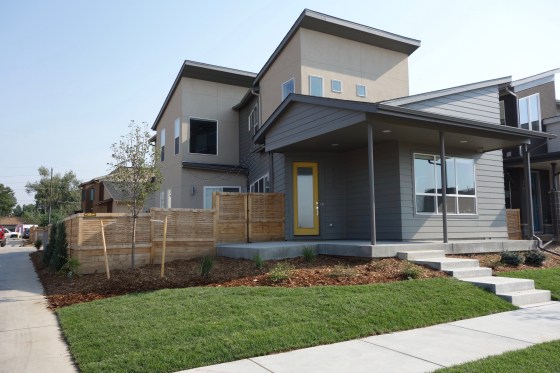
When our front landscaping was installed in mid-August, we admired how our home finally had curb appeal, but now it was time to do the final touches on our backyard appeal!
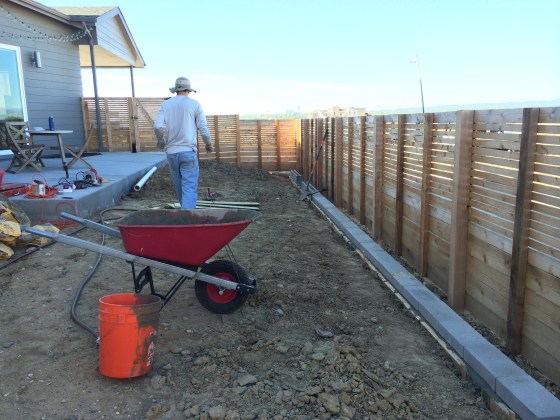
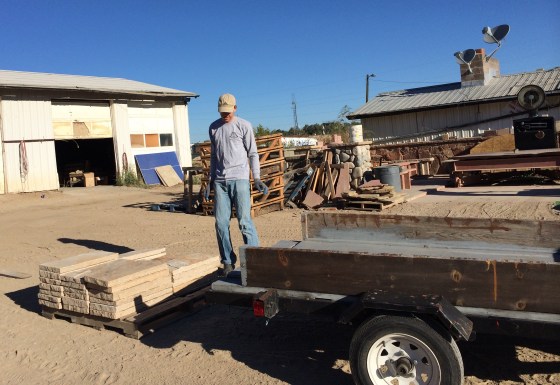
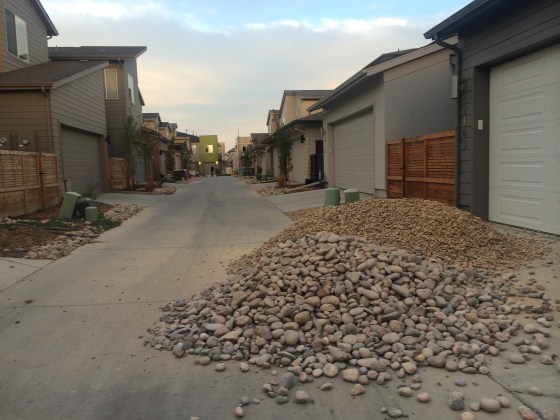
The next few weekends involved many trips to select and/or pick up sod, rock, and flagstone and then scrambling to install it quickly to get it out of our street or narrow alley.
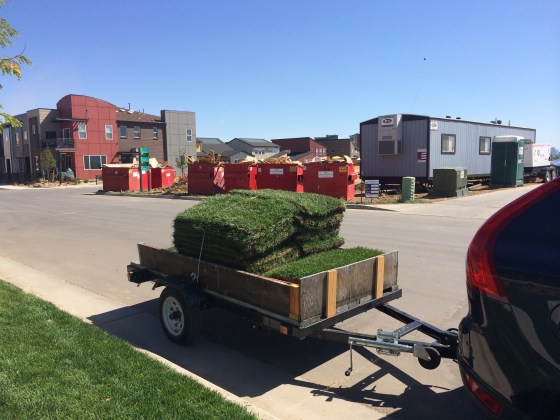
We chose Colorado Bluegrass sod for our backyard because this is what was installed in the front yard and also what seemed to be recommended the most for Colorado yards. The pups wasted no time enjoying their new yard right away. Two years later, the grass has still not disappointed.
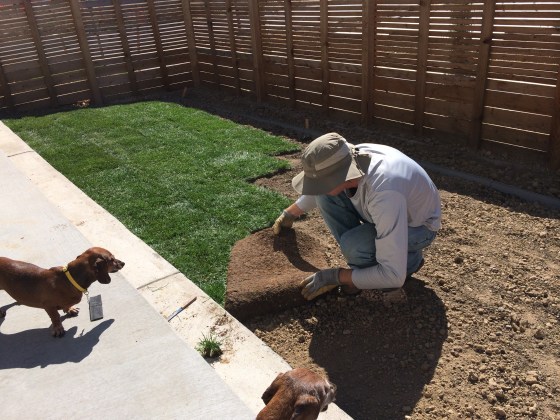
We all made sure to watch and micromanage while dad put in the heavy sheets of grass. Is that a kitchen knife my hubby is using to cut the grass?
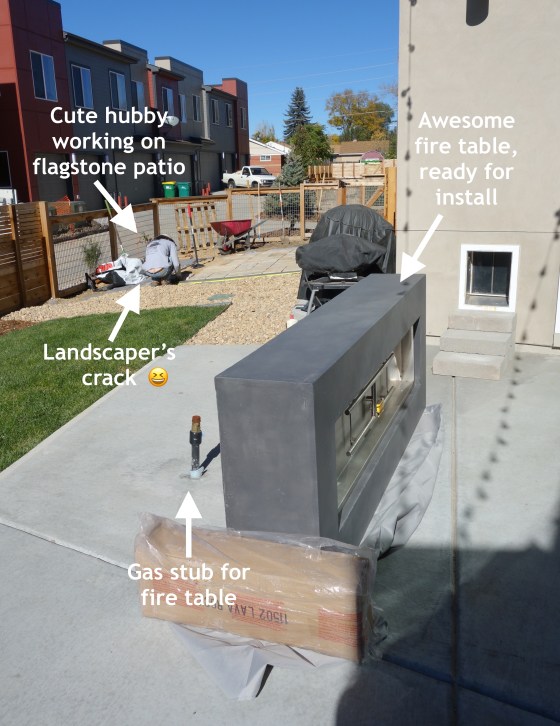
By late October, it seemed like Thanksgiving was right around the corner and we were racing the clock to have our outdoor space finished in time for Thanksgiving, which we were planning to host. Hubby was spending every weekend shoveling rock and laying down flagstone for our patio (not to mention, also installing a dog door into the side of our house).
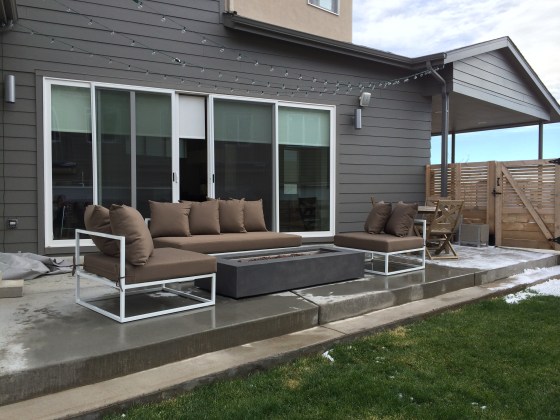
Meanwhile, I was making some “tough” decisions on our patio furniture and fire table. We had planned ahead to have the builder install a gas stub in our concrete patio, so all we needed to do was install a gas fire pit (technically called a fire table). We had originally planned on making a traditional looking fire pit out of brick until we realized that this design didn’t really fit the modern look of the home. We started scouring online for fire tables that were modern and somewhat affordable and came across the company Restoration Hardware. Though some designs were quite pricey, we found one that was worth the cost for the modern look. This was probably the “furniture” delivery I was most excited about getting, and as a bonus, it was relatively easy for hubby to connect to the gas stub.
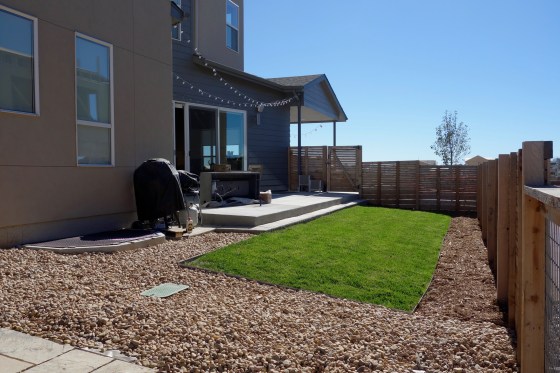
With literally no more weekends to spare, we picked up our new patio furniture from CB2 and made the final touches on our backyard just in time for Thanksgiving
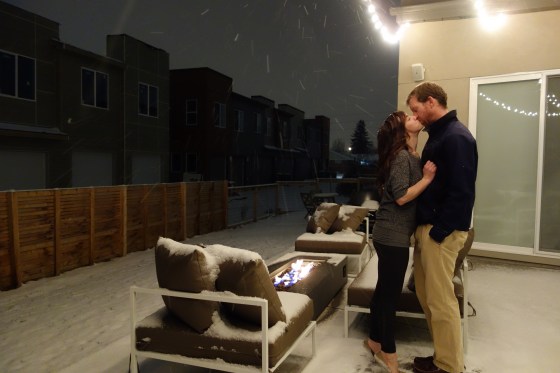
Then, Thanksgiving came and it snowed on top of all the hard work we did! Whaa-whaa. We were still glad to have the yard done by the time cold weather hit and we were certainly excited to have our toasty fire pit ready to enjoy for the chilly winter nights.
While the DIY backyard option involved giving up several weekends from July to November, the cost was significantly less doing it ourselves. Total cost was approximately $5,500, but did not include any trees/flowers/vegetation, which would finish later when the weather warmed up again!
- $1,900 – Misc. supplies (for tools, concrete, retaining wall, wood fencing, etc.)
- $650 – Rock (for backyard and additional modifications to front yard)
- $1,350 – Flagstone (for separate patio)
- $200 – Sod
- $1,400 – Fire pit
Stay tuned. . . in the next post (and following summer) we stain our fence, install trellises, and glam up our yard with trees, flowers, and planters.

Thank you! My husband and I recently moved into the Midtown neighborhood (Dec 2017). Soooo helpful to see your landscape drawing to get an idea of what the “HOA” is looking for and what they will approve. :)